Microsoft have been advocating passwordless for a long time and we (me, colleagues at Coligo, friends and others working with security in the Microsoft area) are pushing more and more customers towards passwordless. The most obvious reason for going passwordless is improved security, but it can and will also mean an increased user experience. However, there is a problem in the modern world which still lingers and negatively impacts the user experience.
Modern deployment meaning Autopilot and Intune
Organizations staying at the top of game is not using only passwordless but also Autopilot and Intune. Using Autopilot without the ESP page is not really an option, so I see this as a requirement for most organizations and use cases. That means blocking the device until “everything” is deployed to the device. This is also where the problem kicks in.
The problem: Update rings containing devices
The problem is with update rings when using Windows Update for Business or Autopatch (which by the way are in the process of being merged together). If the update ring has the setting “Enable pre-release builds” set to Enabled in combination with the update ring being targeted to devices, this causes a forced reboot during the Autopilot process. The setting behind the scene is the ManagePreviewBuilds CSP.
Enabling this setting breaks the passwordless flow, as the user will have to go through a second round of passwordless authentication before ultimately reaching the desktop, causing potential service desk calls and causing a bad user experience.
History
This problem has been around for a long time and still exist in Windows 11 24H2 which has just been released. Two additional problems are that the current release of Windows 11 24H2 breaks web sign-in (step 5 below) and that is really troublesome as these users will be forced to going back to using passwords!
Also, the coming feature to automatically have Windows updated during OOBE will likely break this passwordless flow, but fortunately I think we will see controls for the Windows updates during OOBE.
However, it would be best if Microsoft could just make sure to make sure that (new) features do not interfere with the passwordless authentication flow in the first place, of course.
Let’s look at the difference in flow during Autopilot
Below is an illustration of difference in flow and how the user targeted update rings mean a better user experience!
Autopilot with update rings targeted to devices, and having preview builds enabled.
Autopilot with update tings targeted to users, and having preview builds enabled
1. OOBE sign-in with passwordless phone sign-in (could also be FIDO2 or certificate for instance).
2. ESP page kicks in.
3. Reboot occurs during Device setup due to update ring target groups containing devices and having preview builds enabled.
4. Windows welcome screen – passwordless authentication flow is broken.
5. Sign in with for example TAP or passwordless phone sign-in to continue (using web sign-in).
6. Windows Hello for Business enrollment.
7. Desktop.
1. OOBE sign-in with passwordless phone sign-in (could also be FIDO2 or certificate for instance).
2. ESP page kicks in.
3. Windows Hello for Business enrollment.
4. Desktop.
Root cause and workarounds?
Applying this configuration, i.e. ManagePreviewBuilds should not warrant a forced reboot. The fix to this issue is something Microsoft must fix.
Potential workarounds are to keep using Windows Update for Business Update Rings (or Autopatch) targeted to devices, and to keep devices that should be running a preview build in a separate group which is excluded from all regular update rings. Then target update rings with preview build specifically to groups containing users instead.
What about upcoming Windows Autopilot device preparation?
The new “Autopilot 2.0” which is called Windows Autopilot device preparation do not have this problem (for the moment). The flow is a bit different from Autopilot and the Enrollment Status Page so let’s keep this under monitoring as device preparation evolves. For the moment there are quite a few things missing before we can start migrating away from Windows Autopilot to Windows Autopilot device preparation.
Summary
Reducing necessary (or unnecessary) reboots should be top of mind to fix, and if not easily fixed we should be able to control this and make a decision of our own instead of having a reboot forced upon us.
Whenever new features are built from scratch, or changed, two very strict guidelines should apply; 1) Do not force reboots upon anyone (or let organizations control this behavior). 2) Do not break the passwordless flow and keep it intact to keep a secure and user-friendly experience.
Going passwordless should be the goal for anyone who cares about security and preventing identity and cyber attacks. It is possible to be almost 100% passwordless using Microsoft passwordless technologies. However, even if you have moved to not using your password, the password options are still available at Windows sign-in and also within Windows when signed in. It is now possible to reduce the password use in Windows.
New passwordless experience options available in Windows 11
One big step towards truer passwordless experience is to set the policy named EnablePasswordlessExperience. This will give you the following benefits:
No password sign-in option on the default Windows sign-in screen.
The primary user of the device sees only non-password sign-in options, and can only sign into the device using:
Windows Hello for Business.
FIDO2 security keys.
Web sign-in, which in turn uses either Temporary Access Pass (TAP) or the Authenticator app.
Smart cards.
No password options within Windows, when for instance elevating as administrator (UAC prompts). Note: You can still use runas to elevate with password as well as use the password for a local admin account (such as when using Windows LAPS).
The password setting option is removed from Settings > Accounts > Sign-in options.
This will mean that once this new setting is enabled, any user who used to use passwords is now much more likely to sign into Windows with anything else than the password. You can find more about this CSP setting at learn.microsoft.com: Authentication Policy CSP – Windows Client Management | Microsoft Learn.
Password credential provider is hidden from certain UI part of Windows
The reason why I say much more likely to sign in with anything else other than password is that the EnablePasswordlessExperience setting means that the password credential provider is only hidden on the Windows “primary user” sign-in screen.
That means that there are a number of ways to still use passwords in Windows, which is for example required to make sure for instance remote support through help desk is still a viable option:
Clicking Other users on the sign-in screen will allow the user to sign in using a password, as the password credential provider is enabled there.
Password use is available in Remote Desktop Connections and for web sites in Microsoft Edge.
Password can be used with runas to elevate with password as well as use the password for local admin accounts (such as when using Windows LAPS
Password change can still be accessed from Ctrl+Alt+Delete prompt.
Pre-reqs:
Currently, the following operating systems support the new setting EnablePasswordlessExperience:
The Enable Passwordless Experience settings are configured via Intune and are available in the Settings Catalog and this is how I recommend that you configure this new feature:
Enable Passwordless Experience is set to Enabled. This will in practice remove the password credential provider from the aforementioned parts of the Windows UI.
Enable Web Sign In is set to Enabled. This will show the “globe” as a sign-in option on the sign-in screen and acts as fallback for logging in if Windows Hello for Business sign-in fails, or if an administrator needs to sign into the device.
UI changed when passwordless is enabled
When these two settings are enabled, the password credential provider is removed from some UI elements, as well as introducing the web sign-in “globe” on the sign-in screen.
Sign-in screen
At the sign in screen, this is where we have maybe the most benefit of enabling the passwordless experience. The reason is that the option to sign in using password is gone! This will certainly reduce the use of password to sign in. At the same time you see the globe which can be used to sign in when or if Windows Hello for Business fails.
UAC Elevation Prompt
When trying to elevate as admin, UAC kicks in. With the passwordless experience enabled, you will only see passwordless options + the ability to use any local admin account (with password). This is to make sure that help desk for instance can still help via remote connections. The important thing is that the typical end users cannot choose any password options. Basically, this means that there is no option “Use a different account”.
Extra #1 – Interactive logon: Require Windows Hello for Business or smart card policy
Just to get this new passwordless experience one step further, I tried the good old policy setting Interactive logon: Require Windows Hello for Business or smart card policy to Enabled. The idea was to also prevent circumventing the “Other users” trick and disable password use even there, as well as completely in Windows.
But no, that setting will not allow you to sign in with Web Sign-in (which is working by design) so that means the setting is useless unless you can live with having no “back door” into your computers if authentication fails or there are problems.
Extra #2 – Excluding the password credential provider all together
This means that you can disable the password credential provider all together in Windows, leaving no room to use a password anywhere within Windows. This might sound good at first thought but will likely mean trouble for remote help for instance by help desk staff, as they will not be able to elevate as admin when needed.
Extra #3 – KQL Kusto Query to find out who are signing into Windows using passwords
The following query is something I use all the time, and it lists how many times your users sign into a Windows device using password. This is useful for “smoking out” password use at Windows sign-in but also in general in Microsoft 365, with a slight modification.
Extra #4 – Single Sign-On to on-premises resources
When signing into Windows with Windows Hello for Business or security keys, you do not have single-sign on to on-premises resources such as file shares, printers or applications. By enabling Azure AD Kerberos you enable single sign-on using security keys and by settings an Intune setting to use Windows Hello for Business Cloud Trust, you enable single sign-on using Windows Hello for Business.
Summary
The Enable Passwordless Experience that has been added to Windows 11 is a great step in the right direction of becoming fully passwordless, at the same time as not interfering with remote help and support. Anything that can be done to reduce the use of passwords is simply great!
Sidenote: If you use security keys with multiple identities, you have probably learned that when trying to sign into Windows it will sign you in with the last written identity on the security key. If you like me want to be able to choose which identity to sign in with, please upvote this Windows Feedback item!
Smart App Control is a new feature in Windows 11 22H2 that allows only certain trusted, verified and reputable executables, DLL files and MSI installers to run. Anything not trusted will be blocked from running. This leaves us with a very high security posture.
Microsoft says this feature is intended for consumers and small businesses – and recommends larger organizations and enterprises to use Defender Application Control, which uses the same technology in the background, and has been available since the launch of Windows 10.
This blog post covers Smart App Control versus Defender Application Control in a cloud-native world, where Windows devices are connected only to Azure AD and Intune.
Background
One thing to start with – forget AppLocker as it is too weak and has too many flaws. We need something more secure that also includes anything running on the machine, regardless of user space vs kernel space and also applies to local administrators. At the same time, it must be hard to circumvent which is true for both Smart App Control and Application Control. AppLocker is too easy to circumvent, for instance by using a trusted process by AppLocker to load a malicious DLL file. See a number of examples on AppLocker bypasses here.
High-level overview
Smart App Control
Application Control
Target audience
Consumers and small businesses.
Organizations and enterprises.
Modes
On (Block), Evaluation (Audit), Off.
Audit or Block mode.
Exceptions
No exceptions possible – you are 100% in hands of Microsoft control and deciding what is trusted and reputable.
You can create exceptions; however, it involves a certain amount of administration and manual work.
Enablement
Only for fresh deployment/installations, or resets of Windows 11 22H2.
Any given time – whenever you choose to deploy it.
Goal is to set On (Block) mode, but first Evaluation (Audit) mode
Whenever enabling a technology that will effectively block stuff, it is highly recommended to first assess the situation obtaining intel about what would happen if we set a feature like this in On or Block mode.
So, our goal is without a doubt to first audit and collect information that we can use to evaluate how enabling either Smart App Control or Application Control in block would work. This is the focus to come, when we look at options on enabling audit/evaluation mode.
At the same time, we need to weigh in that running in audit mode gives us no raised security, it will only collect information. The sooner we can enable Block or On mode, the better.
Options to enable via Intune
Smart App Control
Application Control (AppLocker CSP)
Application Control (ApplicationControl CSP)
Technology
Registry value1.
Endpoint Protection configuration profile (uses AppLocker CSP in background).
Using Custom OMA-URI configuration profile using ApplicationControl CSP.
Default Allow policy in Audit or Block mode. “Optional” to use Intelligent Security Graph (reputable binaries), but if you want it to work and not block you from working you MUST use Intelligent Security Graph.
Custom policy which might contain any number and type of rules, including Intelligent Security Graph.
Managed installer
No, not available.
No, not available.
Yes, this is possible. You can set Intune agent as Managed Installer to trust everything that comes through Intune. However, Managed Installer can only be applied via a custom created AppLocker XML file which must be applied with an AppLocker PowerShell command, plus the Application Control must use option 13 which is the “Managed Installer” enable switch.
Reboot
No, not when applied but requires a reboot to take effect.
When applied it forces a reboot of the computer, both in audit and block mode. This breaks ESP (Enrollment Status Page) when using Autopilot.
No, not when applied, but needs a restart to take effect (unless you specify option 16 when creating the policy).
1 Registry value to configure Smart App Control is found in HKLM\SYSTEM\CurrentControlSet\Control\CI\Policy. The DWORD value named VerifiedAndReputablePolicyState can be set to 0 = Off, 1 = On or 2 = Evaluation.
AppLocker CSP vs ApplicationControl CSP
The big difference is that the AppLocker CSP always requires a forced reboot, which means we cannot use it in practice when doing Autopilot and using the Enrollment Status Page. That leaves us with manual configuration of Application Control via ApplicationControl CSP, which is the most secure option where you are in total control. The only problem is that this involves many manual steps, and this surely needs a user interface (in Intune).
“WDAC policy deployment via the AppLocker CSP will continue to be supported, all new feature work will be done in the ApplicationControl CSP only”
You can check what policies are applied, if any on your computers, by looking at two places in the file system. If only one single policy is applied, which is the case if using Application Control with AppLocker CSP, it will be found in the below directory and names SIPolicy.p7b:
C:\Windows\System32\CodeIntegrity\CIPolicies
However, if multiple policies are applied, which is the case if you applied Smart App Control or using ApplicationControl CSP with base and supplemental policies, they will be found in:
You can also start msinfo32.exe and see the current configuration.
Caption from msinfo32.exe
Analyzing potential impact of Smart App Control or Application Control
Regardless of if you enable Smart App Control in Evaluation mode or Application Control in audit mode, you can and must follow-up in Microsoft 365 Defender portal (https://security.microsoft.com). This is where you find everything you need to get an overview of the current situation.
Timeline
If you go to a specific device in the Defender portal (https://security.microsoft.com), you can explicitly see the actions by Application Control (and Smart App Control).
Device timeline showing block actions for this particular device.
KQL – Advanced hunting
To be able to get the big picture in a larger organization we need to use advanced hunting to get all the information we can about the audit events.
Smart App Control or Application Control in Evaluation / Audit mode
Use the following KQL query to list everything that would be blocked if switching the Smart App Control to On or Application Control policy to Block mode.
DeviceEvents
| where ActionType == "AppControlCodeIntegrityPolicyAudited"
Smart App Control or Application Control in On / Block mode
Use the following KQL query to list everything that is noticed by users that is blocked when running in On or Block mode.
DeviceEvents
| where ActionType == "AppControlCodeIntegrityPolicyBlocked"
To execute these KQL queries, head over to security.microsoft.com and go to Hunting > Advanced hunting and run the query and note the results, see below example:
Blocked actions, i.e. files that were prevented from being executed.
Getting from audit / evaluation mode to Block / On
Getting from Evaluation mode to On when using Smart App Control is technically easy – but the limitation is that you cannot create any exceptions if necessary. This basically means that you will be forced to live with some things being blocked, provide other means of delivering that app such as via Cloud PC, or simply disabling Smart App Control. In the best of worlds, having Smart App Control in On mode from day 1, let it be only for some or almost all devices is a huge security gain.
Getting from Audit mode to Block for Application Control requires some work as you will have to create the baseline policies and test, test and test before deploying full scale.
Something to note here as well is that when using Application Control, it is a strong recommendation to have the policies signed with a code signing certificate to provide the best security, i.e. protect the policy or policies from tampering by users or administrators. The code signing recommendation also adds some complexity to the process and routines around handling the signing itself.
Summary
I agree with Microsoft that Smart App Control is limited when it comes to exceptions and that Application Control is the superior technology to use. However, as it looks right now, there are no shortcuts to using Application Control and for most organizations, the threshold to pass to get to a block mode today is extensive and very time-consuming. At the same time, there are technical implementations that break most Autopilot scenarios which is not OK to step aside from.
What I really like about Smart App Control is that you get it for free when fresh installing or obtaining Windows 11 22H2 machines, having the ability to easily turn on the protection mechanism that will truly protect your devices. And you can start monitoring from day 1, and with minimum effort easily enable the protection mechanism.
The big drawback of Smart App Control is that you cannot make any exceptions if something is blocked and you want to allow it, that is very obvious. In this scenario you would have to disable Smart App Control or present the application to the users in another way, via for instance Azure Virtual Desktop where you could publish the application as a remote application.
So, what Microsoft should provide are the tools that will help IT departments to enable Application Control. There must be an easy way via Intune to 1) making sure we have an easy way of defining the Intune agent to become a managed installer and 2) making it easy to create a great baseline policy, and 3) making it easy to create supplemental policies whenever something needs to be allowed (as an option to deploying the binary via the Intune agent).
I’ve got a myself s Surface Pro X, based on Windows 10 ARM-edition, and thought I’d share the solution to a problem that I suppose more will encounter. After configuring my Surface Pro X for Azure AD join and Intune I soon hit two major problems.
Problem description
OneDrive not starting at all, leaving a crash reference in Event Viewer with reference to PayloadRestrictions.dll.
The Office 365 ProPlus applications works until the device is restarted, then they refuse to start. To get them going again I had to do a repair and then they started working again. At least until the next restart.
Troubleshooting and
finding root cause
The Event Viewer
Application log show that OneDrive crashed with reference to
PayloadRestrictions.dll whenever trying to start it.
PayloadRestrictions.dll has been around for quite some time as a component of EMET (Enhanced Mitigation Experience Toolkit) which is nowadays integrated as the security feature Exploit Guard in Windows 10. With that as a first clue and some interaction with Robin Engström the troubleshooting process continued!
Knowing that Exploit
Guard is in play and mitigations seemed to be in play, looking at the Event
Viewer log Security-Mitigation > Operational log showed that OneDrive was
blocked due to ROP exploit indications:
Process 'C:\Users\<username>\AppData\Local\Microsoft\OneDrive\OneDrive.exe' (PID 12020) was blocked from calling the API 'LdrLoadDll' due to return-oriented programming (ROP) exploit indications.
So then the hunt for
where the configuration was coming from started and as the device is of course
Intune enrolled that’s were I started looking!
It rather quickly turned out to be caused by a Microsoft Defender ATP security baseline in Intune that was applied to my user account.
To be more explicit the Exploit Guard settings clearly state that OneDrive.exe is protected for a number of exploits, including ROP!
Resolution
The solution to both
problems described in the Problems section is to adjust the Exploit Guard XML
file to exclude OneDrive.exe and also the other Office applications to make the
Office applications work as expected.
Forget AppLocker and all its weaknesses and start using Microsoft Defender Application Control for superior application whitelisting in Windows 10 1903 and later.
This is a guide to get you started within an hour or two with what I call “AppLocker Deluxe” and that is Microsoft Defender Application Control,formerly known as Device Guard and up until recently Windows Defender Application Control (WDAC).
Most customers that did not use AppLocker before Wannacry and other types of ransomware attacks are now using AppLocker to prevent malicious software to run on their Windows devices. As many security specialists have shown, there are numerous ways to bypass AppLocker and still get code to execute. One of them being using regsvr32 to download and execute script directly from the internet for instance.
What is superior to AppLocker is Microsoft Defender Application Guard (MDAC). This takes application whitelisting to a new level and with Windows 10 version 1903 it becomes the first time since Windows 10 launched that it is actually usuable in many common day scenarios as the administration can now be on a level which is really to manage. The reason for this it being rather easy to manage now is primarily:
Multiple policies. You can have multiple policies complementing each other so that you do not have to sign everything nor have to create an entirely new baseline each time you want to allow new things to run.
Path rules. You can use path rules as of Windows 10 version 1903. As always, this is a balance between security and useability and administration so bear in mind and use this with caution. What is good is that MDAC comes with a use writable protection.
Pre-reqs for getting started
So to get started in something that looks like a real world scebario you need this:
2 physical machines, different hardware models, that run Windows 10 version 1903 or preferably 1909 or later as that gives you some better insights.
A couple of hours of your time to get going!
High level steps
Create a baseline on each hardware model.
Merge the baselines into one general baseline.
Create a supplemental policy.
Deploy the two policies.
Start the testing.
Switch from Audit to Enforced mode!
1. Create a baseline on each hardware model
Let’s start with creating a baseline policy from two different machines, which will later be merged to one baseline policy. We will start with auditing, and eventually in the end of this guide switch to enforced mode.
Now we set the necessary options for the code integrity policy, which is to use Microsofts Intelligent Security Graph for whitelisting (option 14), to allow supplemental policies to be used (option 17) and then we set Hardware Virtualized Code Integrity (HVCI) to Enabled.
#Automatically trust what Microsoft has deemed trustworthy using the Intelligent Security Graph
Set-RuleOption -FilePath $CIPolicyfileXML -Option 14
#Set the following option to make sure the policy can be applied without reboot
Set-RuleOption -FilePath $CIPolicyfileXML -Option 16
#Set this policy to allow supplemental policies, otherwise we can't supplement this basepolicy
Set-RuleOption -FilePath $CIPolicyfileXML -Option 17
#Now activating Hardware Virtualized Code Integrity (HVCI) and set it to enabled
Set-HVCIOptions -Enabled -FilePath $CIPolicyfileXML
Repeat the above process for at least two models, but preferably for each model you have in your environment (or at least the top five mot used models).
Note: Enabling the Intelligent Security Graph option will white list the installer for 7-Zip for instance. It will then also white list all executables that the 7-Zip installer puts on your system.
2. Merge the baselines into one general baseline
We will now merge the baselines from the two models (or more) and create one single baseline policy.
#When done collecting CIPolicies, merge them to create a common baseline
$CIPolicyfileXMLMerged = "C:\temp\Merged.xml"
$CIPolicyfileBin = "c:\temp\Merged.cip"
Merge-CIPolicy -OutputFilePath C:\temp\merged.xml -PolicyPaths "C:\temp\CIPolicy_modelX.xml","C:\temp\CIPolicy_modellY.xml"
#Then convert to binary format
ConvertFrom-CIPolicy -XmlfilePath $CIPolicyfileXMLMerged -BinaryFilePath $CIPolicyfileBin
Last but not least you must change the name of the Merged.cip file to match the Policy ID of the file which can be found at the bottom in the Merged.xml file, see the <PolicyID> section. The end result should look like {76300157-42A0-4A2D-A383-AF140D64AAE0}.cip.
3. Create a supplemental policy
Now we will create the first supplemental policy to supplement the baseline policy created in step 1 and 2. This is using path rules which is something that was added with Windows 10 version 1903.
#Now create a supplemental policy with file path rules
$CIPolicyfileXMLSupplemental = "C:\temp\Supplemental.xml"
$rules = New-CIPolicyRule -FilePathRule "C:\Program files\*"
$rules += New-CIPolicyRule -FilePathRule "C:\Program files (x86)\*"
$rules += New-CIPolicyRule -FilePathRule "\\server1\installation\*"
New-CIPolicy -FilePath $CIPolicyfileXMLSupplemental -Rules $rules -UserPEs
Set-CIPolicyIdInfo -FilePath $CIPolicyfileXMLSupplemental -BasePolicyToSupplementPath $CIPolicyfileXMLMerged
#now lookup the PolicyGUID from the bottom of the Supplemental.xml file.
ConvertFrom-CIPolicy -XmlFilePath $CIPolicyfileXMLSupplemental -Binary Supplemental.cip
You must change the name of the Supplemental.cip file to match the Policy ID of the supplemental file which can be found at the bottom in the Supplemental.xml file, see the <PolicyID> section. The end result should look like {56B75B7A-06D3-49EF-BCF8-8FC47C6ADA20}.cip.
4. Deploy the two policies
Now, lets deploy the two policies by copying them to C:\Windows\System32\CodeIntegrity\CIPolicies\Active.
For the sake of it, restart the machine. You could also use the below PowerShell command to refresh the policy without reboot:
Now you can start the testing and see what is blocked by fetching the log files which are located in Event Viewer under Applications and Services Logs > Microsoft > Windows > Code Integrity > Operational.
6. Switch from audit mode to enforced mode!
Out of everything that would have been blocked by fetching the logs as mentioned in step 5, create additional supplemental policies and deploy until everything you need to run is white listed. Then, switch from audit mode to enforced!
Even though there are existing configuration settings for enabling Microsoft Defender Application Control in an Intune endpoint restrictions policy, enabling it via those settings will mean very limited control and you cannot use supplemental policies. So, therefore you need to deploy these control policies in another way.
1. Create a source folder in C:\ named MDAC, in which you create a folder named Source, where you copy the .CIP files.
2. Create a textfile named SchTask.ps1 and add the following content.
4. As we will deploy this using a Win32 app, download the Intune content prep tool and run the following command from the extracted IntuneWinAppUtil.exe.
5. Create a new Win32 app in Intune and use the following parameters when adding it:
Program install and uninstall command: powershell.exe -ExecutionPolicy Bypass .\SchTask.ps1 Running as System.
Detection rules: Type: File Path: C:\Windows\System32\CodeIntegrity\CiPolicies\Active File or folder: {GUID}.cip Detection method: file or folder exists
6. Assign the app and wait for the MDAC policy to apply. This can be verified by running msinfo32.exe and watching the status for Windows Defender Application Control.
Next steps: Looking at the CSP for Application Control for even smoother deploying via Intune.
As with all new Windows 10 releases, there are a bunch of new features and bells and whistles. To the business and end-users this can mean great benefits. Here are the business values of upgrading to Windows 10 version 1903 (also referred to as 19H1), from a business, security and IT perspective.
Note: Windows 10 v1903 / 19H1 is not yet released, the features exist only in current Insider builds, which are possible to try out if you opt your organization into Windows Insider for Business.
The business case
By deploying the Windows 10 v1903/19H1 update your organization can:
Save many minutes for each user in your entire organization Potentially you can save a few minutes times the X number of users per month in your organization, when your Windows devices are updated with new Windows updates. This is possible as the user login is done automatically after restart (with the screen locked of course), meaning your end users do not have to stare at the login screen waiting to start LOB apps.
End-user improvements for finding relevant resources Chrome integration with Timeline feature is added and improvements to searching and finding stuff is improved. This means that users can find relevant resources they are working on or have worked on faster than before.
Reduction in help desk calls With the new features added in Windows 10 v1903/19H1 you can see a reduction of ~5%* or more help desk incidents and support calls. This is thanks to automated troubleshooters, disk space reservation changes and fixes that previously caused help desk calls.
Let’s break this down and go into more details!
Increase in user productivity
There are several new features and design changes that will increase user productivity.
Automatic sign-on after restart and updating saves many minutes! This time-saving feature is to this date only available for cloud-only domain joined Windows 10 devices, not domain joined, nor Hybrid Azure AD joined (although GPO configuration tend to state otherwise). What it means is that the end-user will save many minutes after each update and restart! The requirements for this is (except for cloud domain joined Windows 10 device): BitLocker enabled which is not suspended during upgrade, which in itself requires a TPM 2.0 chip and Secure Boot to be enabled.
Chrome Timeline extension The Timeline was introduced in Windows 10 v1803 and is a great way for the user to have all history of documents you worked on, sites you browsed etc. within a few clicks! With the Chrome Timeline extension (named Web Activities), the end-user will also see browsing history from Chrome in their Timeline.
Enhanced search and indexing The search feature in Windows 10 v1903/19H1 is now listing top used apps and recent activities (i.e. opened documents) providing easier and quicker access to recently used files and apps. At the same time, for power users, there is now an option to index the entire C: drive and not only what is available in the user data folder. The settings for this are found in Settings > Search > Searching Windows.
Restart without updating or upgrading This feature has come and gone over the Windows 10 lifetime, but now it works as expected. Whenever a quality update or a feature update is installed, the user can now choose to shut down or restart without having to be forced to install the update. This is a real time-saver and can save the user quite some time and hassle as a forced updating of the device now has become optional.
Windows Light Theme This is not really something you can consider time or cost-saving but has the potential to really impact the end user. For the first time since Windows 10 launched in 2015, there is a new theme that means a better user experience if you prefer light colors and not dark. Switch to the Windows Light Theme by going to Settings > Personalization > Colors and choose Light in the drop down.
Reduction in support costs
Microsoft are adding new feature and have made design changes that will reduce support for Windows 10 starting with Windows 10 v1903/19H1.
Automated troubleshooters Ever since Windows 7 there are built in troubleshooters which can be used to ease the troubleshooting of Windows problems. Starting with Windows 10 v1903/19H1, Windows has the possibility to detect problems and prompt to run troubleshooters to fix problems, instead of the user having to call help desk.
WWAN connections for built-in SIM improvements If you have devices with built-in SIMs, now this works much more stable than ever. First, there has been a problem with if the connection is lost, it was impossible to re-connect without disabling the device from Device Manager. Now, if the connection is lost you can simply re-connect as expected. Another important change is that now you can via the UI change the WWAN connection to not be metered network, meaning everything will from an end-user perspective work as usual (thus with the impact that it will generate more data).
Reserved disk space minimizing problems With Windows as a Service it is imperative that the Windows device has enough disk space. With Windows 10 v1903/19H1 Microsoft has made the decision to reverse 7GB to be able to update itself. I think everyone can agree that a Windows device with 0 bytes left on the disk will with 100% certainty result in a help desk incident. This decision by Microsoft will not only reduce general support calls due to “out of disk space” issues, but also raise the possibilities that updates go well, which also reduces work load for IT.
Security
As with all new Windows 10 release, Windows 10 v1903/19H1 is no different. Security is a baseline pillar of the modern desktop and modern workplace, and with modern threats you cannot overlook this. Here are a couple of
Complete secure browser experience, with Chrome, Edge and IE11 Windows Defender Application Guard (WDAG) has been available for a few versions now and really provides a super secure browsing environment. As many organizations use Chrome (and some Firefox), now you can “tie up the sack” so to say and make sure that Chrome and Firefox also adhere to WDAG, using the WDAG extension for Chrome and Firefox. This way, you can use IE11 for the old legacy web apps, while using Chrome or Firefox for other internal or external apps and then Edge for creating an extremely secure browsing experience on the web. Of course, you can use only Edge and IE11 together as well, but many users tend to want to use Chrome after all. The dependency for using WDAG with Chrome and Firefox is to use the Windows Defender Application Guard Companion app (this is not needed if only using Edge and IE11).
Protection history for Windows Defender Exploit Guard features etc. Having history of protections for antivirus is something everyone expects and have solutions for, but what I want to highlight is that now you can find Exploit Guard protections here as well, meaning you can follow-up on actions related to Controlled Folders and Attack Surface Reduction. Go to Windows Security > Virus & threat protection > Protection history to find the history.
For IT
Windows Sandbox The Windows Sandbox is a container solution where you quickly can get an isolated Windows 10 instance running, for testing stuff out. The use cases for this solution becomes a lot more when you consider there are config file possibilities!
A bunch of new MDM possibilities… Many new MDM policies are added, and to be more precise 70** MDM settings are new for Windows 10 v1903/19H1. A few of them are listed in Changes in MDM enrollment documentation. You can also see all possible settings by taking an MDM enrolled device, go to Settings > Accounts > Access work or school > <click your join and then click the Info button> > Export results, and look at the last section which lists all possible settings which can then be referenced and investigated for options.
…as well as new GPO settings In general we don’t see as many GPO settings added as MDM settings to each new Windows release, but some new GPO settings are for Storage Sense and Specifying deadlines for Windows Update restarts after quality or feature updates have been installed.
Modern management and deployment
Note: The below is not related nor dependent on Windows 10 v1903/19H1 release and applies to previous Windows versions as well.
Some highlights of Intune improvements since last Windows release:
BitLocker encryption status and TPM version reports.
Win32 app deployment feature is now General Availability – plus troubleshooting possibilities are added.
Rename a device from the Intune console – pushed to the device.
Security baselines so that you can secure your Windows devices easily.
ADMX templates adding some additional hundreds of settings that you can configure on your Windows devices!
Summary
With the changed support statement detailed by Microsoft last summer, many organizations decided to skip the spring releases and only deploy the fall releases of Windows 10.
With the above I think you have a good understanding on how your organization can benefit of deploying Windows 10 v1903/19H1 in many ways, and you can make a qualified decision on whether or not you will deploy the spring/H1 release of Windows 10.
—————————————
Foot note:
* Very rough estimation based on my soon four year-experience with Windows 10 in multiple organizations. ** Based on Insider build 18356 compared to Windows 10 v1809. This number can change.
Some web apps might not work after installing the June (or July) 2016 Cumulative Update for Windows 10.
Problem
After installing June (KB3163018) or July (KB3172985) cumulative updates for Windows 10 a specific web app was broken, when browsing to it in Internet Explorer 11 or Edge lead to ”The page can’t be displayed”.
Investigation
Looking at the System log in Event Log showed Schannel errors:
A fatal alert was generated and sent to the remote endpoint. This may result in the termination of the connection. The TLS protocol defined fatal error code 40. The Windows SChannel error state is 808.
Doing a network trace showed that the web app server negotiated the TLSCipherSuite TLS_DHE_RSA_WITH_AES_128_CBC_SHA.
Cause
Windows as of update https://support.microsoft.com/en-us/kb/3061518 no longer support ciphers with 512-bits. Note that this KB was released in May 2016 but not anywhere stated to affect Windows 10. Nothing related to these changes points to Windows 10, but as we can conclude, these changes are introduced with June 2016 CU for Windows 10 (and thereby carried forward to July CU and any other CU to come).
The one most common misconception around AppLocker is the fact that it could be used to allow standard users to install stuff that in any normal case would require administrator privileges. This is absolutely 100% incorrect.
What AppLocker does is set a number of rules on what can be run and executed on a machine. It is important to note that if you allow something to run or be executed via AppLocker rules the user will still need the appropriate privileges if the setup or application itself require administrative privileges at some point in time such as when doing automatic updating for instance.
It’s been around for some time and if you did not already know about it Microsoft provide the free tool called Security Compliance Manager. You can use it to very easily manage and export a set of pre-configured (or settings that you configure on your own) settings that improve security. You can then export these settings to for instance a group policy and import it into your domain.
There are templates with pre-configured security lockdowns for Windows XP, Windows Vista and of course also Windows 7. The tool works great for creating a security baseline for your client machines but the only downside is that you cannot import nor in a convenient way compare the settings in the templates with what you currently have.
At the TechNet/MSDN after work I attended last week I got an interesting question on why a user (domain admin) gets a UAC popup on trying to access folders via Explorer which he knows for sure he is supposed to be able to access looking at the ACLs of the folder. Instead, when clicking OK on the UAC popup the ACL is populated with his account.
My first thought to this behavior was Explorer.exe not being able to elevate and the “split personality” i.e. the two security tokens involved when UAC is in effect. Here comes a more detailed explanation that I think is of interest to more. Note that this problem also covers some other scenarios such as AppLocker rules not appearing to work as intended for administrators. Read on to learn what is causing this.
First when UAC is enabled you get two security tokens when you log in, easily explained as one which contains the administrator privilege information and one which does not. Most of the times you run everything using the standard security token. When you for instance want to install software or change some system settings, then the security token containing the administrator privileges information is used.
If you do not explicitly request an application to launch with higher privileges, or the applications itself request higher privileges, all processes and applications run in the user context with the standard security token. Virtually all applications including Windows applications and processes are possible to elevate by right clicking and choosing “Run as administrator”. This is not true for Explorer.EXE though as all your attempts to elevate it will not result in any actual elevation. There are a few caveats with this and let us continue with the example of access certain files and folders.
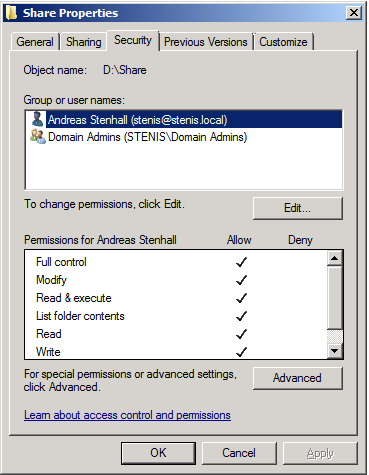
So let’s have a look at what the ACL of the folder D:\Share looks like:
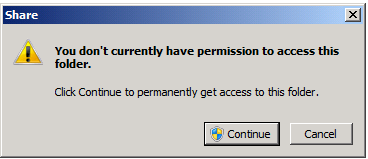
We can clearly see that there are no user accounts in this list. Under normal circumstances any user which is a member of the domain admins group should be able to access that folder but instead is presented with the UAC dialogue:
What happens when the user “stenis” in this case clicks “Continue” to that UAC dialogue box questions is that the ACL is populated with the user account in questions:
This happens because the fact that Explorer.exe cannot be elevated the normal Windows Explorer does not see that the user account should be able to access that folder. It is easy to verify as you can actually run Explorer.EXE elevated by changing the registry setting “RunAs” to “_RunAs” in HKEY_CLASSES_ROOT\AppID\{CDCBCFCA-3CDC-436f-A4E2-0E02075250C2}. Thanks goes to Andre Ziegler for this finding.
So what does this tell us? It is a somewhat strange problem but still by design. The fact is that this “problem” is not applicable to the folder and file access as described in this blog but also for AppLocker rules for instance, as many domain administrators must choose “Run as administrator” to be able to run software which they think they should be able to run without this little procedure.


You must be logged in to post a comment.