Tag: MDT

Remove client from collection in OSD task sequence using Orchestrator

A common setup when using System Center Configuration Manager to deploy is to have an OSD collection which has a required deployment. Moving clients to that Collection will let them be reinstalled or installed. After deployment is done you typically want the machine removed from that collection. There are a few ways of doing that but my favorite is using an Orchestrator runbook.

Orchestrator Runbook Configuration

Note: In this guide I assume that you have installed System Center Orchestrator 2012 SP1 or 2012 R2 in your environment.

1. First you need to download and install the Orchestrator Integration for Configuration Manager which will add the items we are using to remove the machines from a Collection in Orchestrator Runbook Designer.

2. Start Orchestrator Runbook Designer and setup the connection to the ConfigMgr primary site server by going to Options > SC 2012 Configuration Manager.

3. Add a connection to your SCCM server and make sure to test the connection using the Test connection button before proceeding.

ORC23

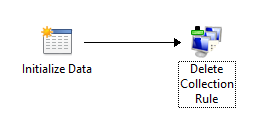
4. Now Create a new Runbook and go to Activities > Runbook control and drag “Initialize data” to the Orchestration pane. Do the same by choosing SC12012 Configuration Manager under Activities, and then drag  “Delete Collection Rule” out on the Orchestration pane.

5. Hover over the Initialize data icon and then drag the arrow to the Delete Collection Rule. It should look like the below image.

ORC
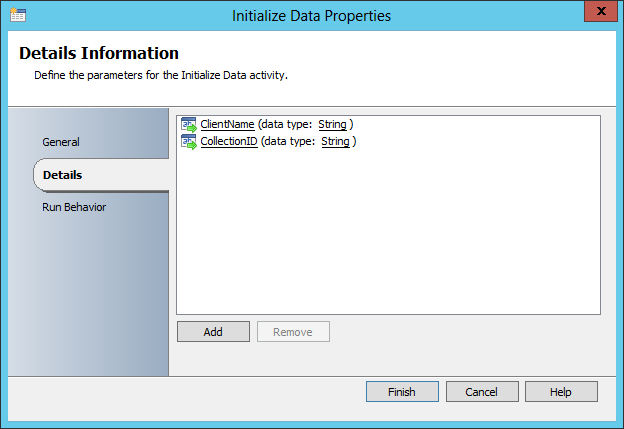
6.  Right click Initialize Data and choose Properties. Add two details and name them CollectionID and ClientName.

ORC21

7. Right click Delete Collection Rule and choose Properties. Start by choosing the connection you created in step 3. Note: Do not type in the text as below, instead right click the area right to Collection and choose Subscribe > Published Data. Choose CollectionID and click OK. Repeat for Membership Rule. Choose Finish when done.

If you type in the text manually you will get this error when executing the runbook: The SMS Provider reported an error. Details: Generic failure

ORC22

8. Before proceeding I strongly recommend that you execute the runbook in test mode, supplying a client name and collection ID of a machine located in the collection you want the client removed from.

Note: Do not forget to check in the runbook after testing and when you are done, or it will fail to execute during operating system deployment.

Task Sequence Configuration

Now that the runbook is running successfully you can use it in your Task Sequence. Note: This requires that you have integrated Microsoft Deployment Toolkit with Configuration Manager and that you are using an MDT Task Sequence.

Modify a task sequence and create a New group. The recommended section to run the Runbook is in the State Restore phase of the Task Sequence. To be on the safe side first run a “Gather”, then you must add “Use Toolkit Package” and last but not least execute the actual runbook by adding the “Execute Runbook” step.

ORC4

Also note that runbooks are run with the SCCM network access account so you must add that account to the Orchestrator user group that you have assigned, check the permissions and which group name to add to the relevant Orchestrator group in  Runbook Designer by right clicking the name of the runbook tab and then choose Permissions.

If you do not you will get this error in the  ZTIExecuteRunbook.log (where all events related to the runbooks are stored):

Unexpected response from web service. 405 Method Not Allowed
< ?xml version=”1.0″ encoding=”utf-8″ standalone=”yes”?>
< error xmlns=”http://schemas.microsoft.com/ado/2007/08/dataservices/metadata“>
<code></code>
<message xml:lang=”sv-SE”>The requested operation requires Publish permissions on the
Runbook</message>
< /error> ZTIExecuteRunbook 2014-07-03 10:01:56 0 (0x0000)

Happy orchestration and deploying!

80070002 and 80072ee2 error when deploying Windows using ConfigMgr 2012 R2

Encountered an interesting issue doing Windows 8.1 Deployment using ConfigMgr 2012 R2. A specific model was constantly failing at the very last step in the task sequence. The smsts.log revealed a few errors with the codes 80070002 and 80072ee2, failing at random files every time from the MDT Toolkit Package.

A few examples:

DownloadFiles() failed. 80072ee2.
DownloadContentAndVerifyHash() failed. 80070002.

It seems Microsoft is aware of the issue and the current workaround is to set the following variables first in the task sequence to address the problem until it hopefully will be fixed in a coming hotfix.

SMSTSDownloadRetryCount = 5
SMSTSDownloadRetryDelay = 15

After settings these variables the deployment finish as expected.

HOWTO: Prevent deploying Windows over VPN

Doing Windows deployments over VPN is not a very good idea and it will work really bad. If you are using MDT to do Windows deployments you can easily prevent deploying Windows over VPN.

The easisest way is to modify the customsettings.ini to simply not install anything if the network card’s gateway is what we define as the VPN gateway. So lets look at the default customsettings.ini before we modify it.

[Settings]
Priority=Default

[Default]
OSInstall=Y
SkipCapture=NO
SkipAdminPassword=NO
...

Now let’s look at what we will do to modify it to fit our needs. We will add a check so that the first thing we do is to check if the machine is on a VPN connection and if so not install anything. In the example we have two default gateways defined.

[Settings]
Priority=DefaultGateway,Default

[DefaultGateway]
10.0.0.1=VPN
10.0.1.1=VPN

[VPN]
OSInstall=N

[Default]
OSInstall=Y
SkipCapture=NO
SkipAdminPassword=NO
...

Happy deploying (but not over VPN)!

Creating the perfect and fully automated reference image for Windows operating systems

A perfect reference image for Windows is fast to deploy, contains all security updates and all other necessary patches and possibly also applications like Office and least but not last is fully automated to achieve the best possible stability and to avoid the potential of manual errors. This guide is intended to show you how to build the perfect reference image ever made!

NOTE: I have also posted this guide to TechNet Wiki where you find an improved version of this article (although the steps in the article found below is still valid): TechNet Wiki: HOW TO: Create the perfect and fully automated reference image for Windows operating systems

There is no need to invent the wheel again as this can be achieved very easy in Microsoft Deployment Toolkit. Start by downloading Microsoft Deployment Toolkit and in the components section make sure to download and install Windows Automated Installation Kit. Start Deployment Workbench and off we go!

Note: This guide applies to everyone regardless if you are deploying Window using SCCM, MDT or any third party deployment solution.

1. In Deployment workbench create a new share for creating the reference image so start by creating a new one and name it like “Reference image build and capture share” or something of your choice.

2. Add the OS install files (repeat for each OS you want to build for) into the operating systems folder. Always include the setup files so never install just a WIM file at this stage.

3. Create a task sequence based on the Standard client task sequence (repeat for each OS you want to build image for).

4. For each task sequence edit the task sequence to enable the existing but disabled “Windows Update” step(s).

5. Edit the rules of the share by right clicking it and choosing Properties. The rules (customsettings.ini) should look like below. Replace the variables BackupShare and BackupDir with whatever the share name and directory to store the images are.

[Settings]
Priority=Default
Properties=MyCustomProperty

[Default]
OSInstall=Y
SkipAppsOnUpgrade=YES
SkipCapture=YES
DoCapture=YES
SkipAdminPassword=YES
SkipProductKey=YES
SkipUserData=YES
SkipTimeZone=YES
SkipFinalSummary=YES
SkipSummary=YES
SkipLocaleSelection=YES
SkipDomainMembership=YES
SkipComputerName=YES
SkipBitlocker=YES
SkipApplications=YES
ComputerBackupLocation=NETWORK
BackupShare=\\server\share
BackupDir=Captures

6. Modify the bootstrap.ini to look like the below information. Replace the variables according to what applies to your configuration.

[Settings]
Priority=Default

[Default]
SkipBDDWelcome=YES
DeployRoot=\\server\share
UserDomain=CONTOSO.COM
UserID=username
UserPassword=password

7. Now add to the Rules (customsettings.ini) a section named like below. This sets that the Windows Update step will point to your WSUS server, where you are in control of everything that is released by Microsoft and thereby staying 100% in control of what is in your image.

WSUSServer=http://nameofwsusserver

8. To make sure that you get a separate name for each operating system you are building a reference image for edit each task sequence to contain a Task Sequence Variable named for instance:

BackupFile=Windows7Enterprisex64.wim

9. Update the deployment share to get boot ISO which you use to boot your virtual machine and start the build process.

Remember to always build the reference image on a virtual machine to avoid potential problems related to hardware.

You could also add the Office as an application in the Deployment Workbench and to all task sequences that require it to make sure that you have a rapid deployment image ready to go.

Done! Happy deploying!

Deployment Roadshow vNext and Windows 8 loadfest

Two events are coming up; Deployment Roadshow vNext featuring System Center Configuration Manager 2012 and Microsoft Deployment Toolkit 2012 and a Windows 8 loadfest.

Deployment Roadshow vNext will take place in Sweden’s four largest cities and it will be presented by myself and colleague Johan Arwidmark from Knowledge Factory, Wally Mead the SCCM guru from Microsoft Corp and Mikael Nyström from Truesec. More info about the event at http://www.deploymentevents.se.

The Windows 8 loadfest will take place in early December in Stockholm and it hosted by me, Johan Arwidmark, Lars Gustavsson and Tim Nilamaa. More info about the event at http://www.deploywindows8.se.

Patch machines during deployment with MDT 2010

In MDT 2010 you can enable two settings that during deployment of your machines will patch them automatically using a WSUS server of your choice.

Take a look at your existing task sequence(s) and look for “Windows Update (Pre-Application Installation)” and “Windows Update (Post-Application Installation)” and choose to enable them both or just the latter.

In your customsettings.ini somewhere beneath the [Default] section add the row:

WSUSServer=http://WSUSServerName