Most books written about Microsoft products are very focused on one single product. A book about Windows Server covers all you need about the server OS itself. A book about System Center Configuration Manager covers everything you need to know about ConfigMgr in its bubble and a book about a Windows client covers everything you need to know about the client itself.
The book Enterprise Client Management using Windows Server 2012 R2 and System Center 2012 R2 covers not only the Windows client (Windows 7 as well as 8.1) but how to manage it using Windows Server 2012 R2 and the System Center 2012 R2 products. So all in all a complete scenario on how to manage your Windows clients in the enterprise in a very effective way using Microsoft management tools available.
The book is now also available on Kindle as of mid April 2015!
Many thanks to all of you who attended my session yesterday. So here is a summary of the key takeaways from my session “Preparing for Windows 10” at TechDays Sweden 2014 November 19th. Consider this an action list in what you can do todayto prepare yourself form Windows 10.
Cleaning up
Yeah, it is so boooooring, but still a golden opportunity to make your client environment more standardized and less complex. Make sure to remove GPOs and GPO settings that are not necessary, remove or replace scripts, applications or components that are not needed. Also, if you have a Premier support agreement with Microsoft, do use the RAP as a Service for Windows Desktop to let Microsoft do an analysis of your environment and suggesting remediation.
Application compatibility
App compat when moving from Windows 7 to Windows 8.1 or 10 is practically 99%+ success in terms of regular Win32 based applications. Still actual testing of applications needs to be done for business critical applications.
New way of doing inventory in Windows 10
There are new WMI classes in Windows 10 that can be used to collect software inventory. The information can be displayed using PowerShell. Also, there is a feature that inventories what framework or runtime an application is dependent on, for instance which version of .NET Framework or Visual C++ Runtime and it can even see if there are dependencies for OpenSSL. Imagine having these feature in place when the HeartBleed bug appeared earlier this year.
Display all installed applications on a Windows 10 machine:
Display all apps and dependent frameworks on a Windows 10 machine for a specific application (replace the ProgramID in the filter section with another one from the above example):
What I forgot to mention in yesterday’s session was that these feature are being back ported to previous Windows versions, as that is where you’d typically want to run the inventory, but much of the feature regarding this new way of doing inventory is still work in progress.
Applications in a mobile world
With Windows 8.1 and Windows 10 and the new types of devices that make users more mobile gives other challenges. It is one thing that the OS and devices are great at supporting a mobile work scenario, but without apps that also adhere to this environment you will have challenges. Make sure that the technology to deliver the user experience is evaluated, upgrade the user interfaces where necessary or port them (or parts of them) to modern apps.
Internet Explorer
In terms of moving to Windows 8.1 or Windows 10 you will face the most application compatibility challenges with IE11 and web apps. After the summer Microsoft announced that from January 2016 only the latest version of IE will be supported on the currently supported OS’s.
Are you running your intranet sites in IE7 mode?
Regardless if you run IE8, IE9, IE10 or IE11 you are very likely to (without knowing it) running all or many your internal web apps in IE7 mode, due to this nasty little settings still being default in Windows 10 and IE in Windows 10.
That is the setting that you will find by going go Tools menu and then Compatibility View settings. The setting which I strongly recommend to uncheck (set it via Group Policies) is called “Display intranet sites in Compatibility View”. I have seen this setting causing problems with web apps because modern web apps and systems stop supporting IE7 and thereby not working in IE11.
The Display intranet sites in Compatibility View should be turned off / unchecked!
Deploy Internet Explorer 11 today!
Well, deploy IE11 today and start working with compatibility testing your web apps!
IE11 Enterprise Mode
Enterprise Mode in IE11 is a compatibility mode that runs web apps in IE8 mode to make them work on IE11. With the November 2014 CU update for IE11 you will be able to not only set web apps to run in IE8 mode but also any document mode such as IE10, IE9, IE7 or even IE5.
For those of you already running IE11 – inventory tool!
Not long ago Microsoft released a little tool that will inventory all the web sites a user visits to provide means to get a grip on web app compatibility. The inventory is activated on specific clients (or all if that is OK in terms of integrity etc) and is collected via WMI to for instance System Center Configuration Manager. There are pre-made reports that can be used. More on Enterprise Site Discovery Toolkit for Internet Explorer 11.
You get detailed information on which IE document mode or compatibility mode is used on sites and specific pages. You will also see which pages are causing IE11 to hang or crash!
Taming the user interface for Windows 8.1 enterprise users
A good thing to prepare for Windows 10 is to deploy Windows 8.1. Some time ago I wrote a blog post on how to customize the user interface in Windows 8.1 to make it work as expected and make it easier for the end users. Read the blog post Taming the user interface for Windows 8.1 enterprise users.
Install Windows 10 Technical Preview
Of course you can and should install Windows 10 Technical Preview for a number of reasons. Test applications, test in-place upgrade and last but not least, provide Microsoft with feedback either using the built in Windows Feedback app or via UserVoice. This is a unique opportunity to still influence how and what Windows 10 will be!
UEFI
Windows 8.1 and Windows 10 have a security feature that is dependent on that a machine is installed in UEFI mode, that is Secure Boot. UEFI replaces the 30 year old BIOS that has “always” been around. Note that Microsoft talks very much about in-place-upgrades from previous versions to Windows 10. However, as switching to UEFI demands that you reinstall your OS you will not be able to get the full benefit of Windows 8.1 or Windows 10 if you are running your machines in legacy boot mode.
Figure out if your machines are running in UEFI and if not, make sure that you have an infrastructure that supports it and that you switch to UEFI mode in your client machines BIOSs’.
The easiest way to determine if you are running in UEFI mode is to run msinfo32.exe (only in Windows 8/8.1 and Windows 10). There is a new line that clearly displays that.
Using msinfo32 in Windows 8, 8.1 or 10 will give you straight info on if you are running in UEFI or Legacy (BIOS) mode.
If running Windows 7 (or later) you can determine if running in UEFI mode by starting diskmgmt.msc and note if you have an EFI system partition. If you do, you are running in UEFI mode.
In Disk Management you can determine if running in UEFI mode or Legacy (BIOS) mode. If you do NOT have an EFI System partition you are running in Legacy/BIOS mode.
If you have Configuration Manager you can look at the pre-made report Hardware – Disk > Disk information for a specific computer – Partitions to see if you have machines that either are running in Legacy/BIOS mode which will have partitions named “Installable File System” or UEFI machines that will have GPT partitions and in particular a GPT System partition.
In Configuration Manager reports you can determine if running UEFI machines by looking at the inventory of partitions. GPT System disk means that the machine is a UEFI machine.
Cloud connections
If you haven’t already done so look into Azure AD and what is has to offer. The cloud connections in Windows 10 will be significant!
Summary
There are quite a few things you can do to prepare yourself for Windows 10 so that you are ready when Windows 10 is released sometime next year. Happy Windows 10’ing!
So to summarize the key areas which you can look into when optimizing performance from an infrastructure point of view here is a summary of the key takeaways from TechEd session WCL326: Five infrastructure changes that will boost performance for the Windows Client.
1. Slow machine boot and login / GPOs and scripts
Use Windows Performance Toolkit (part of Windows 7 SDK) to troubleshoot what is happening during boot. Specifically narrow in one Group Policy in the section in the Generic events and look for and enable only the Group Policy provider to see what’s going on with group policies. Group policies and scripts are most often the bad guys when having performance problems with boot and login.
Also use Event Viewer > Applications and Services > Windows > Group Policy > Operational log to look for instance events with id 5326, 8000, 8001or 5016. In particular the last one is of interest as this will quickly show you which Group policy extension is taking most of the time to finish.
Cleanup, remove unnecessary settings and GPO objects. Convert scripts to Group Policy Preferences as necessary or make scripts running scheduled after startup or login to minimize the boot and login times.
2. Optimizations for RDP
Activate asynchronous login for users to speed up login for Remote Desktop Services and RemoteApp. Go to Administrative templates > Policies > System > Group Policy and set the setting for “Allow asynchronous user Group Policy processing when logging in to Remote Desktop Services”.
Three other really great tweaks found in Administrative templates > Policies > Windows Components > Remote Desktop Services > Remote Desktop Session Host > Remote Session Environment:
Do not allow font smoothing = Enabled
Limit maximum color depth = Enabled, set it to 32-bit
Set compression algorithm for RDP data = Enabled, set it to Optimized to use less network bandwidth
3. SMB 2.1
To get full use of performance improvements in SMB2.1 protocol you need file servers that are running Windows Server 2008 R2 or if you are running a third party storage solution to activate SMB2.x support as that is not always activated by default and sometimes a firmware upgraded is needed.
Performance increases based on my own performance measuring are varying from 10-80% performance increase.
4. BranchCache
Activate BranchCache feature from Server Manager on the content servers you want to use with BranchCache. Require windows Server 2008 R2 on the content server. For file shares make sure to enable the BranchCache feature on the share(s) you want to use with BranchCache. Also set the group policy “Hash Publication for BranchCache” on the file server(s) found in Administrative templates > Policies > Network > Lanman Server.
To activate BranchCache on the Windows 7 client look in Administrative templates > Policies > Network > BranchCache and activate the required GPO settings.
5. Upgrade key servers to Windows Server 2008 R2
To gain use of RDP improvements, SMB2.1 improvements and actually make performance better for file handling the simple thing to do is to migrate to Windows Server 2008 R2.
BONUS 1. Microsoft tool to measure performance:
WDRAP (Risk and health Assessment Program for Windows Desktop) is a tool designed for enterprise customers that verifies overall performance, including bad drivers, apps that are causing the machine to start slowly etc. Contact your Technical Account Manager at Microsoft to get more information and analyzing the results with this tool. Microsoft themselves used this tool some time ago to improve performance in their environment, more on this in the Microsoft IT Case Study.
BONUS 2. Hotfixes related to infrastructure and performance, Windows 7 Post-SP1:
You experience a long domain logon time in Windows 7 or in Windows Server 2008 R2 after you deploy Group Policy preferences to the computer http://support.microsoft.com/kb/2561285
Slow performance when you browse the My Documents folder in the document library in Windows 7 or in Windows Server 2008 R2 http://support.microsoft.com/kb/2690528
Improved interoperability between the BranchCache feature and the Offline Files feature in Windows 7 or in Windows Server 2008 R2 http://support.microsoft.com/kb/2675611
General Q and A
Q: Can I use this tool to measure performance and troubleshoot on Windows XP?
A: You can run the tool on Windows XP by copying xbootmgr and xperfctrl.dll to an XP machine. You can then analyse the results on a Windows 7 machine. However do not expect the same amount of detailed data as Windows 7 has introduced new features that are not available in Windows XP.
Any further questions around the session or the topics, feel free to leave a comment to the article or send me an email on andreas.stenhall@knowledgefactory.se.
This guide will take you through the necessary steps to create a DaRT 7.0 installation locally (replacing WinRE) and not having the user need to enter the password for a local administrator account before having the remote connection start. Basically this means that a user can press F8 during boot and choose “Repair your computer” and have someone remotely taking control over their machine and fixing problems which previously required physical presence of IT staff.
Note: There is information on how to do this in official MS documents for DaRT 7.0 but you have to do a lot of reading between the lines so I wanted to take the moment to do a complete documentation on how to accomplish this.
Background on WinRE and local admins
Some basic information about WinRE is that whenever you start WinRE (and that includes DaRT 7.0) when it is located on the machines disk it will always ask you to supply a local admin account information. This is not the case if you boot WinRE or DaRT from USB, DVD, CD or via PXE boot, then you do NOT have to enter a local admin account to gain access to the system. Potential security issue here I might add.
Step by step solution
The dilemma with DaRT and remote connections is that we cannot in most cases let the users know the password of our local administrator account so what we can do is to start the remote connection as soon as possible when DaRT boots. So here is what you need to do to achieve this:
1. Go through the DaRT Recovery Image wizard and create your DaRT.iso. Then extract this ISO file and copy boot.wim which can be found in the sources folder to C:\DaRT and rename it to winre.wim.
2. Start a cmd.exe with administrator privileges.
3. Create a folder called C:\DaRTmount
4. Run the following command (on one line and with no space between “mount-” and “wim”:
5. From the same command prompt, type “notepad” to start Notepad and then browse to C:\DaRTmount\Windows\System32 and open winpeshl.ini. Make sure that this is entered into the winpeshl.ini and then save the file:
6. When the file is saved make sure that you have closed notepad and also all instances of Windows Explorer (yes, the following command might fail if you have Explorer windows open) run the following command:
dism /unmount-wim /mountdir:C:\DaRTmount /commit
7. After the image has been saved you need to replace the existing Windows recovery environment with your customized DaRT installation.
8. Start by making sure that you show hidden and operating system files (via Windows Explorer – Organize – Folder and search options – View).
9. Go to C:\Recovery (if you get “access denied”) you need to modify the access control list, add your account or everyone full control to this folder.
10. Now scroll down the folder structure until you reach where winre.wim is located. Now copy your modified winre.wim from C:\DaRT to this location. Remember to set the ACLs back on the recovery folder when you are finished, that is if you modified them.
11. Test by booting the machine and press F8 just before Windows starts loading and you will get “Repair your computer” option. Choose that and see how the Remote Connection is started along with the prompt for local administrator password, giving your users a chance to let you connect and then giving the IT staff enter the password.
This is a very common question and one that I would say all companies migrating to Windows 7 has experienced. The scenario is how do we handle user group policy settings when we have multiple operating systems such as Windows XP and Windows 7 or in the future also introduce Windows 8?
First I strongly recommend that you do not reuse the user configuration for Windows XP for Windows 7. Group policies tend to grow over time and at most customers I have encountered a lot of rubbish in the old configuration. Starting over and migrating only what is needed minimize the risk for problem and makes the configuration slicker and more easy to manage in the long run.
But how do we make sure that users get one configuration when they log in to for instance Windows XP and another configuration when they log in to a Windows 7 or Windows 8 machine? Well, let’s have a look at the options including pros and cons followed by recommendations from the field.
1. Security group filtering
Pros:
– Require no change in OU structure/move of users.
Cons:
– Requires a lot of management and make it hard to administer.
2. Separate users into a new and old OU
Pros:
– Easy to do if you have very few users and no dependencies to other services or applications.
Cons:
– Not a manageable solution in an environment with many users.
– There are often apps or services that rely on the users being in a certain OU which is making it hard to move users without affecting other services.
3. WMI filters
Pros:
– Keep the users in the OU they are today not affecting other services or apps that rely on users being in a certain OU.
– A longterm investment in making it easy to introduce new operating system versions.
– Quick determination (WMI is often known to be real slow but this particular query is not performance intensive).
Cons:
– Need changes for existing environment, i.e. for instance Windows XP user configuration.
– Could make group policies not being applied due to problems with WMI repository or related services.
4. Loopback processing
Pros:
– Keep the users in the OU they are today not affecting other services or apps that rely on users being in a certain OU.
– Very reliable solution.
Cons:
– If not Replace mode is used you need to handle current configuration.
– Might become a mess to troubleshoot and maintain if naming and config is not done consistent and clear.
Recommendations from the field
In my professional opinion the only real alternatives are WMI filters or loopback processing and sometimes I recommend WMI filters for separating user settings depending on what operating system they are logging in to and sometimes I recommend loopback processing. It depends on the environment and needs for the customer. Many times moving the user accounts around is not an alternative but consider that a very good alternative if possible to accomplish.
How do I implement it in my environment?
1. WMI filters
In the Group Policy console you create multiple WMI filters for for instance Windows XP and Windows 7. You then set each WMI filter respectively on each GPO containing user settings for each operating system. NOTE: Always test it out before applying this configuration to your existing environment. Also note that this does not affect performance to any noticeable amount of time.
Windows XP:
SELECT * FROM Win32_OperatingSystem WHERE Version LIKE "5.2%" AND ProductType ="1"
Windows 7:
SELECT * FROM Win32_OperatingSystem WHERE Version LIKE "6.1%" AND ProductType ="1"
Windows 8:
SELECT * FROM Win32_OperatingSystem WHERE Version LIKE "6.2%" AND ProductType ="1"
Basically the version is the OS version as we know it and the ProductType=1 means that it is a client operating system.
So you will end with for instance one GPO named “User Configuration – Windows 7” which have the WMI filter for Windows 7 machines set and one GPO named “User Configuration – Windows XP” which have the WMI filter for Windows XP set.
2. Loopback processing
A prerequisite for using loopback processing is that you keep computers in separate OUs, for instance XP computer accounts in one OU and Windows 7 computer accounts in another OU.
You then create GPO objects in the OU for Windows 7 in our example and configure the user settings there. As I think you should always separate Computer and User configuration GPO:s I would say that you in a Computer configuration policy in that same OU set this setting for the user settings to be applied when users log into Windows 7 machines:
Policies – Computer configuration – Administrative templates – System – Group Policy and there set “User Group Policy loopback processing mode” to Replace or Merge, depending on what you want to achieve and how you want to handle your current configuration. Replace mode is recommended as you will have a hard time maintaining and troubleshooting the configuration otherwise.
Done! When users log on to your Windows 7 machines they will get the user settings you have defined in the user configuration GPOs located in the Windows 7 machines OU in our example.
Two events are coming up; Deployment Roadshow vNext featuring System Center Configuration Manager 2012 and Microsoft Deployment Toolkit 2012 and a Windows 8 loadfest.
Deployment Roadshow vNext will take place in Sweden’s four largest cities and it will be presented by myself and colleague Johan Arwidmark from Knowledge Factory, Wally Mead the SCCM guru from Microsoft Corp and Mikael Nyström from Truesec. More info about the event at http://www.deploymentevents.se.
The Windows 8 loadfest will take place in early December in Stockholm and it hosted by me, Johan Arwidmark, Lars Gustavsson and Tim Nilamaa. More info about the event at http://www.deploywindows8.se.
It seems a fairly common misconception is that to be able to use Windows 7 in a Windows or should I say Active Directory environment one need to have either Windows Server 2008 or Windows Server 2008 R2 domain controllers. There are also misconceptions about the need to raise the forest and domain functional levels to be able to use the full power of Windows 7. Neither of these are true.
You can get all the same features if you are using Windows Server 2003 domain controllers and that is also regardless of which forest or domain functional levels you are running with. The most common misconceptions are:
Group Policy Preferences. Work very well in a 2003 domain. However you need to manage the group policies from a Windows 7 or Windows Server 2008 R2 machine using Group Policy Management Console found in the Remote Server Administration Tools.
BitLocker. To store recovery keys in AD you need to extend the schema. If you have a domain controller that is running Windows Server 2008 or later you have what it takes, if you are running Windows Server 2003 on your domain controllers you simply extend the schema.
I must add that you get stronger encryption for Kerberos by using Windows Server 2008 domain functional level though but the bottom line is that the functionality of the Windows 7 client is the same regardless of forest or domain functional levels.
When testing application compatibility when moving to Windows 7 you can use ACT (Application Compatibility Toolkit) and the tools in there to test and fix applications. Another tool that you can use to learn about dependencies when compatibility testing your applications is a tool called Dependency Walker.
With this tool you basically open a system file, for instance a DLL or an OCX file, and it will list its dependencies to other files on the system. This can be good for finding what is causing registration of for instance DLL or OCX files to fail on Windows 7 while it works fine on Windows XP. There can be runtimes missing.
Today I visited a customer site where the customer had setup a central store, meaning all group policy defintion files and language files are placed in the SYSVOL share for better management of group policies. One benefit of that central store is that all administrators managing and editing group policies are using the same templates.
The problem in this case was that whenever they started editing a group policy they got tens and tens of warning about various admx files along with for example resource errors. I looked into PolicyDefinitions folder in the SYSVOL share and immediately noticed that there was admx and adml files missing and that there were mismatch between the version of the admx and adml files.
I took a Windows 7 with SP1 client and added/replaced all admx files from there. After that I took the en-us folder and replaced what was in the SYSVOL folder with that one, followed by doing the same for the sv-se, i.e. the Swedish language files. While at it I installed IE9 and put in the inetres.admx and respective adml files for each language to have the capabilities of editing Internet Explorer 9 policies as that is to be included in the Windows 7 image. Voila!
So the bottom line is; keep the central store consistent and make sure that when you create the store that you populate it with admx and adml files from the latest client OS with service pack when managing Windows 7, and that you do make sure that you have the same version of all admx and adml files or else you will get errors due to mismatching files.
When companies deploy Windows 7 most of them are looking at the 64-bit version of Windows 7. This architecture of Windows does not support running 16-bit applications, which unfortunately still is widely in use. If you do an inventory with ACT (Application Compatibility Toolkit) it will inventory all executables as well as CMD files and some other stuff and it will contain information about 16-bit applications lying around and being used by the users in your business.
The trick is that the GUI does not provide a way to view these applications so you have to turn to doing a SQL query using for instance the SQL Management Studio Express tools. Use the SQL Query below to get information on any none 32- or 64-bit executable. The query (thanks to Chris Jackson) will return for instance WOW (Windows on Windows) or DOS applications and that will/might indicate a 16-bit app which you should prioritize to test and handle as necessary.
 Most books written about Microsoft products are very focused on one single product. A book about Windows Server covers all you need about the server OS itself. A book about System Center Configuration Manager covers everything you need to know about ConfigMgr in its bubble and a book about a Windows client covers everything you need to know about the client itself.
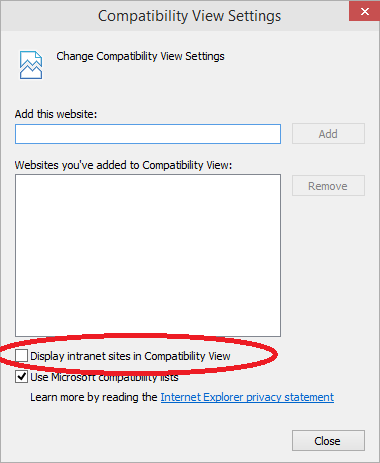


You must be logged in to post a comment.