This is a follow up to the post “Internet shortcuts in the Start menu not returned in quick search in Windows 10“. The plot thickens quite a lot with Windows 10 v1607.
UPDATE February 8, 2017: The fix is out! Read more in this blog post: LNK files now searchable in Windows 10 search (Cortana / Start menu search)
UPDATE August 21, 2016: In a newly opened support case with Microsoft they have come to the conclusion that this is a code defect and will be fixed, for both LNK as well as URL files. Question is when it will be fixed, and (*irony*) if it will be distributed quickly in the background using the sneaky update method I wrote about in a recent blog post.
UPDATE August 12, 2016: It seems that Microsoft has also introduced this change in Windows 10 v1511! The option “Search my stuff” in the search box in the start menu and task bar is long gone! Read more about the sneaky update of the search feature in not only 1511 but also 10240 (CBB and LTSB).
Scenario
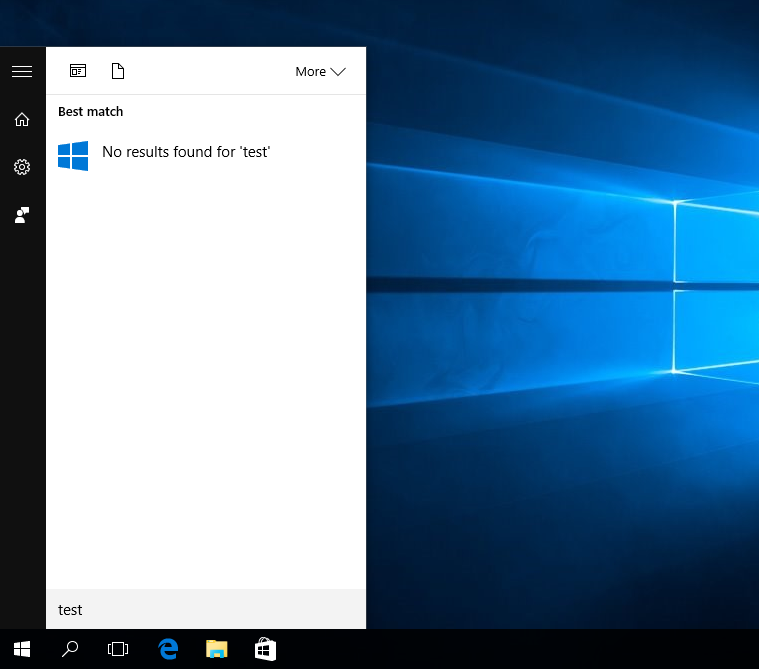
It is no secret that web applications become more and more common for every day that passes and that has been the case for many years now. I know Microsoft wants and thinks that everyone is now turning all their Line of Business applications into modern apps but that’s just not the case just yet. This is a fact on how it looks in the real world. With that said, the problem here is that Internet shortcuts in the start menu that points to a URL is listed in the Start menu list of applications but they are not searchable in the Windows search feature.
Now things get interesting and at the same time worse! In Windows 10 v1511, you can search for an internet shortcut by typing its name and then choosing “Search my stuff”. In 1607, this option is gone. So without applying any workarounds the user must go back to find the web application by manually browsing through the long applications list in the start menu. So, with that we can tell all the users we for 10 years have tried to learn to use the search feature now to go looking for applications manually in the start menu. Well done Microsoft!
Lapse in logic? I and users expect that whatever application can be seen in the start menu (EXE, modern apps or web apps) is also found when doing a search! As described above, this is not the case in Windows 10 version 1607.
Workarounds
Yes, there are workarounds, but only crappy ones.
- You can exchange all LNK and URL:s and point them to iexplore.exe URL, i.e. “iexplore.exe http://www.microsoft.com”. This is what Microsoft recommends. Hmm, well is that a good solution? So when the customer wants to switch their standard browser will this workaround be a good idea? This workaround kind of defeats the idea of defining standard programs and URLs open in the browser defined as the standard program. I try to make my customers Windows client environments less complex and more standardized but this workaround points in the opposite direction to that.
- You can also instruct the users to open the web site in Internet Explorer 11 and choose “Add Site to Apps”. By doing that you get a shortcut with the extension .website which is listed in the Start menu AND apart from that also being indexed and searchable! Is it possible to create these .website files and distribute? Not quite, as these were invented for IE9 where users could pin websites to the Task Bar, and are intended to be pinned by the user, not programmatically. Also, .website files are always opened only in Internet Explorer regardless if you set the OS standard browser to Edge or some other browser.
Summary
To sum it up, am I the only one having customers with internet shortcuts in the start menu? The reason they are there is that I do not want users to have to distinguish if a Line of Business application they use for their daily work is a EXE file or a web application (or a modern app for that matter). I expect them all to be treated the same as well as existing in the same place. I expect that EXE applications are returned in the search results. I expect modern apps to be returned in the search results and I expect web applications (internet shortcuts) to be returned in the search results.
That is just simple logic in my world but who knows, I might be all crazy. I know 10000+ users that must think Microsoft are crazy when they are forcing users to go back to manually finding stuff instead of using search!
Solution
There is no solution so I appeal to Microsoft and specifically the Search team, that you repair the lapse in logic that exist in the current implementation in Windows search in Windows 10 1511 and 1607!


You must be logged in to post a comment.